Hacking Duracell's Powermat Battery: Difference between revisions
Abbie Normal (talk | contribs) |
Abbie Normal (talk | contribs) |
||
| Line 42: | Line 42: | ||
==Problems== |
==Problems== |
||
===It's not automatic |
===It's not automatic, you have to press a button!=== |
||
*When the battery is drained or there is no load on the output, the battery will switch off after several seconds. Switching it back on requires a button press. |
*When the battery is drained or there is no load on the output, the battery will switch off after several seconds. Switching it back on requires a button press. |
||
**Low power applications might not be enough load to keep the battery on. (e.g. a nightlight that's off during the day.) |
**Low power applications might not be enough load to keep the battery on. (e.g. a nightlight that's off during the day.) |
||
Revision as of 18:04, 31 December 2014
Since this is a work in progress, where I don't know exactly where I'm going, and with several directions to explore, this is going to ramble. Once I've got somewhere, I'll probably branch off a conclusions article for the people in a hurry.
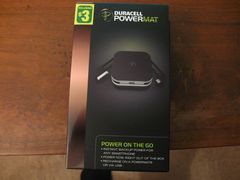
While camping summer of 2014, I discovered that my cell phone will quickly suck its battery dry in marginal coverage areas. So, when the local discount warehouse had Duracell Powermat battery packs for $5, I picked one up. It works great for keeping my phone charged, especially when I'm using it as a wifi hotspot for my tablet or netbook.
I have no idea why this unit is suddenly being dumped on the market at low prices. Huge overproduction, replaced by a new model, some hidden defect, or perhaps the latest iPhones are finicky about what chargers they accept? Dunno. (If anyone has any hard info, email me. It's on the About page.)
When the local Dollar Store had bunches of them for $3, it was the time and price to hack them for other uses! I should have bought a bunch because, as great stocking-stuffers, they were gone when I went back next week. Hopefully there'll be more later. 12/30/2014: Success! They had more in stock at $3, so I picked up another three. I might get more after I have purposes for them.
The tiny manual says "Do not disassemble the charging device. There are no user-serviceable parts inside." Bwahahahaha! (Read Vernor Vinge's Rainbows End for what I think of that!)
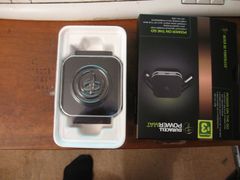
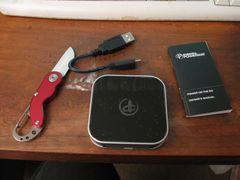
Battery unit
- Charge inputs:
- Micro-USB connector and 5" USB cable.
- Duracell Powermat inductive pickup. (Base charger not included.)
- Output: Built-in Apple and micro-USB connectors, 5V 1A.
- 1850 mAh lithium battery.
- Power button and 4 charge level LEDs.
- Case: 3"x3"x3/4", rounded corners, aluminum or aluminum-like plastic body, black or white colored top and bottom inserts.
Gallery
Thoughts
Because batteries don't keep a steady voltage during their discharge cycle, and smart phones are picky eaters, it probably has some kind of boost/buck converter to maintain a constant output just under 5 volts. Likely it also has one on the inductive charging input pickup to turn the AC into DC at the correct battery charging voltage. That has the possibility of being hacked as an input from a number low power sources: small solar cells, wind belts, lemons, etc. If not, then rolling your own boost converter isn't hard. I also have similar 1.5V AA to USB chargers that could be re-purposed too.
Reading the manual, the Powermat base unit can detect when the battery has been fully charged through the inductive pickup. Interesting. I looked to see if anyone had pulled one apart to see how the system works, but didn't find anything. It's probably something clever checking the load on the inductive output. (The inductive pickup is just a transformer with separate windings.)
No doubt this unit has its own microcontroller embedded in there somewhere to manage everything. It'd be nice if it had overcapacity, spare I/O and could be hacked and harnessed, but I wouldn't bet on it. (It's a battery pack, not a Qeng Ho localizer.)
Sample applications
- Emergency light with three LEDs and resistor left over from a broken flashlight. Charged from a USB hub.
- Rechargable battery pack for radio. Replaces 3 AA batteries.
- Remote power. Re-purpose a cheap solar patio light as a case and low power charger. Use it to power wireless sensors, alarms, data collection, etc.
- A cheap UPS for projects like a Raspberry Pi or Arduino. A data line to signal that the battery pack is running low, save everything and shutdown now would be good.
- A USB charger pack. Okay, not much of a hack there-just cut off the Apple connector and add a mini-USB plug, and it'll charge my GPS on long-distance scooter trips when it sits in my pocket with an earplug in my ear for directions. Those AA to USB chargers fall behind, and I've spent some time sitting on back roads in the pitch-black cold, burning AA batteries and waiting for it to charge up. (Not a total waste: Pitch-black with fireflies!)
Problems
It's not automatic, you have to press a button!
- When the battery is drained or there is no load on the output, the battery will switch off after several seconds. Switching it back on requires a button press.
- Low power applications might not be enough load to keep the battery on. (e.g. a nightlight that's off during the day.)
- If the battery drains, it won't switch back on when it has recharged.
- Work-around: hard-wire the button on?
Sleepy at the switchover
- Power cycling as a UPS. The battery will charge a phone while being charged/maintained itself. However an initial test showed that, on input power loss, it doesn't smoothly switch from its charge input to its battery power, and caused a reset of my Raspberry Pi.
- Work-around: A big cap on the output to smooth-out the fluctuation?
Dissection
- The unit is sealed by the top and bottom insert pieces snap-fitted together through the main body.
- There doesn't seem to be a non-destructive way of getting the ends off to look inside this.
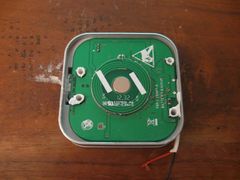
- I slipped a screwdriver under one of the ends and pried up until I snapped the four posts that hold the top and bottom inserts together.
- At it happens, I removed the bottom insert which covers the centering magnet and inductive pickup for the Powermat input.
- This is the boring side of the PC board, with traces but no components.
- I should be able to trim the remaining posts and remove the top insert non-destructively.
- That PCB coil is probably for communication with the base. Likely there's a real copper coil under it for power transfer.
Progress
More later, with pictures, as I disassemble my sacrificial unit.
Experiments to try:
- What happens when the USB charge input gets less than 5V, perhaps a lot less, like 1.5V from a solar cell? Most USB devices would turn up their nose, but if there's kick converter on that input, it might just up the voltage and drink what current it can take. If that worked, it wouldn't be necessary to dissect units to get at the inductive charge circuit or use my own converter in front of that input.
External links
- Wikipedia:Power Matters Alliance. This is the interface standard that Duracell is compatible with.
Remember: Don't throw away those old printer parts. They could be the core of your next giant killer robot!


