Quick, cheap and dirty Pi motion detection
There a number of ways to detect motion using a Raspberry Pi:
- A webcam with motion-detection software. Doesn't work in the dark, and high overhead.
- Ultra-sonic sensor. High overhead and overkill. Save it for robot and drone projects.
- Passive Infra-Red detector or PIR. These are simple, cheap and ideal for most projects.
There are many easy tutorials on using PIR detectors with the Pi, like this one, but what do you do when you want it now, there are no local parts places, and ordering can balloon in cost with shipping/tax and involves waiting?
Reduction to a problem already solved
Enter the discount stores: Dollarama, Dollar Store, Poundland, etc. These stores are great low-priced graveyards of small electronics that can be re-purposed to other projects. I've picked all kinds of stuff in these places: webcams, Bluetooth buttons, USB battery packs, etc, for pocket change. (See bigclivedotcom's YouTube channel. If you're curious about something, check his channel, because he's probably already taken one of them apart.)
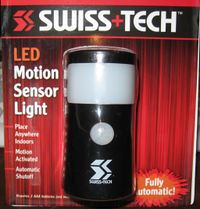
There will probably be a variety of motion detection items: outdoor floodlights, etc. For this, I chose a Swiss+Tech salt shaker-sized motion-detection nightlight for a few dollars. (The company is in Ohio, the units are made in China, but it's Swiss+Tech, hmm.)
The unit takes 3 AAA batteries, has a switch on the side to turn it on. When it detects movement, it lights up for 45 seconds then switches off. I don't know if I need the nightlight, but why not? (I can already navigate by all the LEDs in my room, even with the blue ones taped over.) The case will be useful, so that I can mount it wherever and run a cable back to the Pi.
A Deconstruction of Falling Stars
On the back, there's a screw for the battery cover. That doesn't help. The case is held together by three snap-fit tabs on each side. I had no luck wedging a very fine straight-tip screwdriver into the front/back join to pop it open. In the end, I used pliers to break a piece off the back and pop it open from the inside. I can run a cable out through the hole, so it's not a big loss. With some sealant, I think the case could be weather-proofed easily.
The circuit is an old school single layer PC board with the PIR detector, IC, 2 white LEDs, 2 transistors, various full size resistors and capacitors. A nice touch is that the components are labeled with their value rather a part number. It's quite easy to work with without a microscope and soldering micro-waldo. The AAA batteries and switch run to connections on the board.
The circuit (more or less)
The brains of the circuit is the BISS0001 IC chip[1], which seems to be common for PIR modules. In this video, Big Clive (dot Com) looks at a typical circuit and how to tweak it. Odds are, whatever unit you buy, it will have that chip. {{#evp:youtube|2dxhbXHYEG0}}
Notes
- ↑ BISS0001 Datasheet PDF – Micro Power PIR Motion Detector IC, datasheetcafe.com
